well its official I’m no longer a student so from now on when i post on this blog it will be all projects I’m working on in my free time rather than uni work so with that said i thought id post my new project idea for the up coming months possibly longer but it will depend on jobs and work schedules etc but i do plan to post something on this project a few times a month .


i started to develop the idea for princess dragon a few weeks ago but wasn’t sure if i was going to go ahead with the project but after writing a prologue and gathering a lot of  positive feedback from family and friends i have decided to actually develop this idea .


prologue (rough draft)

Many years ago there was a kingdom ruled over by a young princess, she was kind and loving to her subjects and the land thrived because of it.

But as the years passed and the princess grew, so did the jealousy of the other Kingdom’s, as was custom by law when the princess became of age she was to marry.

Seeing this as an opportunity to take the throne for him a greedy duke from one of the neighbouring kingdoms hatched a plan to marry the princess and rule over her kingdom.

The duke offered her his hand but she declined, the princess had fallen for another, a young just prince from a distant land, enraged by this the greedy prince hatched a plan to get rid of both the prince and the princess and allow him to rule the kingdoms.

The duke was treacherous and tricked the prince into going out hunting with him; skilled in the dark arts the duke used his black magic to transform the prince to stone statue

With he prince now out of the way the duke returned to the princess and spun her sad tale of how the prince had perished on the hunting trip but he had sent her one final gift.

An ancient jewel, the princess stricken by grief believed the dukes lies and put on the jewel, almost instantaneously she was transformed into a mighty beast, the duke called for the castle guards, claiming the dragon had eaten the prince and princess, the guards charged at the dragon, the princess however was able to escape into the forest and the duke was able to become ruler of the land………


using this prologue i plan to create a intro to the animation ,almost like a build up to a game ,as for the style ,i am planning to use stained glass windows as the basis for the introduction , i decided to go with this idea after witnessing my friend playing child of light  in which they use stained glass windows to set the story of the game,

child of light introduction

i found this style very interesting as its something unique and not many people seem to have animated using this style before ,i also looked briefly at using a storybook as the opening sequence but i decided that this was an over used method of introducing stories .
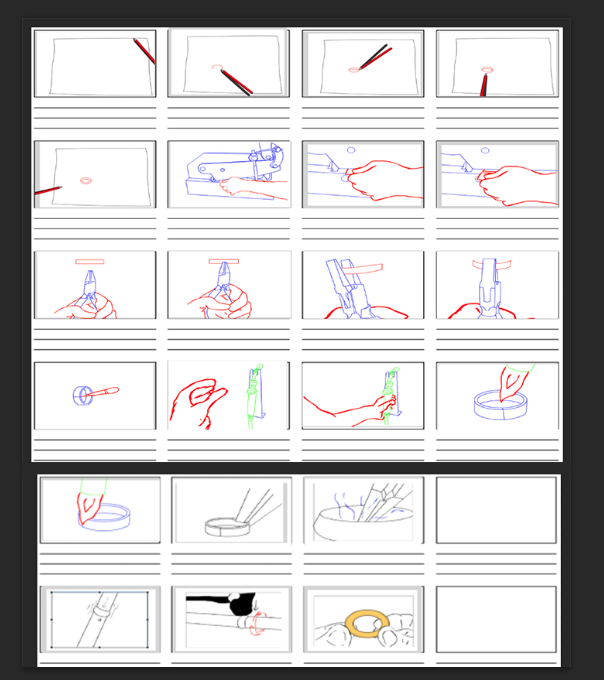
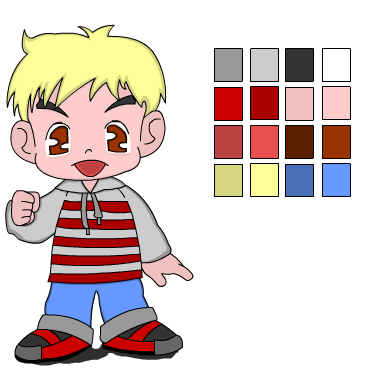
 

planning the piece


once i have got my prologue right i plan to begin by designing character sheets for all the characters in the sequence , from there i will start storyboarding the prologue piece and then move on to producing an animatic ,if all goes according to plan i should be at the animatic stage by august time .


So I would like to start by saying it’s been along time since I last updated this project, this is due to two reasons the first being my laziness and the second being that I had to change my original concept.


So back when we started this project I came up with what I thought would be a simple enough idea to produce, which was to create a rotoscoped piece of animation, which would be shown within an object, which was going to be a rotating ring.


But as I got into the project I discovered that this was trickier than I thought as rotoscoped animations involve a tedious and slow design process, and after a few attempts at this particular style of animation I found myself extremely board by it, by this point it was Easter break so I was able to go away and use the two weeks off to have a re think about the direction I wanted to go with my project.


After Easter break I decided to do something relatively simple but at the same time informative, and that was to create a animated version of the process of making a ring, which is almost the same as my original idea but this version wont be rotoscoped.


So with a new idea comes the whole process of design and as my idea had now changed I had to start from the beginning with the planning process.


Rough storyboard

Screen Shot 2014-05-07 at 03.28.18


Its not 100 per cent finalised but this storyboard is a basic version of what I intend to show in my animatic, (provided orsome gallery approve of my new idea).


Part one –orsome gallery animatic

(for some reason youtube isn’t letting me use the embed link but i will replace the above link with the embed asap)

post meeting 08/05/14

after the meeting today with oresome gallery its evident that i will need to make a few more changes to my storyboard before i can advance any further with the project.

firstly i will need to change the design of the pliers that i have used in my storyboard draft as they are the wrong sort of tool to be using.

this can be easily rectified and to make sure im using the right references for my storyboard ,after the client meeting we took some additional photos of all the equipment in the gallery.

second was the colour scheme, the clients requested that i look more into using their logo colours as i hadnt got round to thinking about that part of my design yet.

overall the changes that have been requested shouldn’t be to difficult to implement and i should have at east a new storyboard by next week and possibly the start of my animatic.

08/05/14 re worked storyboard

Screen Shot 2014-05-08 at 05.42.14

i was able to re design the storyboards relatively quickly this time around (due The the reference photos ) i also took into account the changes that the clients at orsome gallery requested and added in a few additional scenes which i think have dramatically improved the piece ,my plan now is to have at least a rough animatic designed before the next meeting which should be friday the 16th.

ok time for an  fmp update finally…


so basically iv gone through a lot of changes from the original idea i had last year but i am finally catching up with the work and have now produced the first 28 seconds (in rough format) which i am willing to show .


animation fmp pt 1 rough (28 seconds)


this first sequence is still in the works but i have managed to get it together so that i can finally show what iv been doing on this project.

this sequence is open for adaptation in the future i.e. adding in lip syncing which i did originally want to do but due to all the changes to the project i have opted to get the sequence finished with ought the mouth movements and just have some audio in the background but i could adapt the piece at a later date.

i still need to finish the start of this piece so that the character turning looks right as well as adding in some more movements on the hair and eye at  22 seconds , as well as clean up several key parts of the sequence .

and obviously then clean up the whole sequence .


some of the things in this first part i am really happy with is the fight scene between the two characters , i think it turned out really well….it took me several tries before i got it to this stage and i am really happy with the end result.

still got a long way to go before its finished but i feel like i have improved a lot since my first year so i am really happy with how this project is going .


i aim to have rough part two finished  by the end of easter break (28th) so by then i will hopefully have a minutes worth of content which is my goal for this piece, but it will probably end up being between about 1.00 -1.30 give or take ,i also intend to update this project more instead of being lazy like i have been .


update two  6/04/14


so shortly after writhing this post i actually ended up finishing the rough sequence for my f.m.p (as i solidly worked on it most of saturday and sunday ,its taken me a while to catch up but i finally have a rough edit of my sequence , however i still need to get a few of the timings correct as well as cleaning up the piece which is what i will be spending the fast majority of my time doing from now till the hand in

finished rough sequence

so if all goes according to plan i should be able to get most of the piece finished for the degree show although I’m not sure if it will be possible as its only a month away…..but i feel like if i work on this piece solidly i can finish it in time .


For this meeting I met with alex  and Abbie to discuss how the project has been developing. For my updates i have been looking further  into the process of roto-scopeing which i discussed with our client and they seemed to like the idea.

some info on rotoscopeing

Rotoscope output can have slight deviations from the true line that differs from frame to frame, which when animated cause the animated line to shake unnaturally, or “boil”. Avoiding boiling requires considerable skill in the person performing the tracing, though causing the “boil” intentionally is a stylistic technique sometimes used to emphasize the surreal quality of rotoscoping, as in the music video “Take on Me”.


Rotoscoping (often abbreviated as “roto”) has often been used as a tool for visual effects in live-action movies. By tracing an object, a silhouette (called a matte) is created that can be used to extract that object from a scene for use on a different background. While blue and green screen techniques have made the process of layering subjects in scenes easier, rotoscoping still plays a large role in the production of visual effects imagery. Rotoscoping in the digital domain is often aided by motion tracking and onion-skinning software. Rotoscoping is often used in the preparation of garbage mattes for other matte-pulling processes.

another example of rotoscope i have found is the 2006 film a scanner darkly which is fully rotoscoped (though i wont be able to go into this much detail).

a Scanner darkly

i have also been looking into some rotoscope tutorials for the program i will be using (adobe flash).

how to create rotoscope animation (tutorial video 1)

how to create rotoscope animation (tutorial video 2)

the next stage for my project will be to get a few simple tests done by using the footage i collected from my visit to the gallery ,i should hopefully have at least 3 tests done for our next client meeting next month.

as part of the professional practice unit we are required to work on our identity in preparation for going out into the real world after uni.

this “personal identity ” will be a way of making ourselves known to potential clients so we are asked to design business cards .

i found this extremely difficult to do as i found that al the designs i initially thought of where either to simple or just boring ,so i began experimenting in photoshop with textures and i eventually came across a tutorial for a stained old paper style design which i really liked.

i knew i wanted to use this design for my business card but the question was how, i looked at several options including , a treasure map style design , and an old book before settling on a vintage luggage tag design

i opted for this design because it was simple enough in its look but at the same time had just enough detail make you look at it.also  i wanted to find some way to link my field of work to the card ,and as animator often travel a lot for work i found this design highly appropriate.


its still a work in progress but below is a basic version of front design  i will no doubt be changing and tweaking the design as i go along but for now i am happy with this as my starting point.


Screen Shot 2014-03-25 at 20.35.41

after the initial brief was given to the group i began with the usual  process of researching into the topic,but i found that from looking online i wasn’t getting enough of the correct information i.e what materials and processes that oreome jewellery used so with that in mind i opted to contact the company and organise a day where i could go in and film as much  of the process of jewellery making .

after i had contacted the company i began to look at what method of animation i would use ,i looked at several options but in the end i chose to use the roto-scopeing method.

there where 2 reasons for this , the first being that i wanted to keep the homemade theme going through out my animation so the piece would seem like it was hand drawn which seemed to work with the brief .

the second reason for choosing to use this method was i wanted to try something new that i haven’t done before rather than going for the easy option also i thought that the style would suit the assignment criteria .

at this point i received an email from oresome jewellery inviting me to come in and film for my animation which i was able to do quite easily .

images from my recording session (11/03/14)

i was able to get a lot of video footage from this visit  which i then  edited into a shorter piece which contained clips of what i considered to be the key parts of the creation process .

reference video version one

with this done we then organised a meeting with oresome jewellery so that we could pitch our ideas and see if that was what the company was looking for .

i was given a lot of positive feedback about my idea and they seemed to really like the roto-scopeing method ,although whilst we where in the work shop we filmed some additional shots of the creation process  which i have i will add in to my video for the finished version.

in addition to this we spoke about the colour scheme that i could use but it was decided that for the next meeting i would produce a few tests before making the final piece .

Client orientated practice

Brief part 1-

You are tasked with producing a short sting animation for a small company (www.oresomegallery.com)that straddles the boundaries of retail, education, community and traditional craft.

The task:

Produce a moving image/marque/sting or any other animated product that can be used as part of the company’s online presence.

(One of the main messages that be conveyed is the element of handmade and the time and skills needed to create pieces as this is not widely understood) .

Research and development

To start with as a group we decided to go to the oresome gallery and look around so that we could get a feel for what the company actually is actually about.

After visiting the gallery I then started weighting down possible things that needed to be included in the piece i.e. materials, the creative process and so on ,from here I came up with two basic ideas which are still in need of development.

initial ideas

Idea one-

using the element of natural materials the piece would show a close up of a hand reaching out towards a reflective surface (this could be any of the materials that the company use) the hand touches the surface then opens to reveal a ring or other item of jewellery .

After discussing this idea with my classmate I found that although it was an interesting idea it didn’t seem to portray all the elements that the brief required such as the hand made element.

Idea two-

My second idea came from watching a video on YouTube in which the intro shows a silhouette with items moving with in the shape, I thought about the possibility of adapting this idea to show for example a ring rotating and the creative process would be shown within the shape.

I came up with 2 issues for this idea the first being ,I would need to use the programs I use for animating to a level which I have no idea about  and secondly there’s the time it would take to produce the piece ,if I went with this idea I think it would take far to long to actually produce and it would only be a short piece.

At this stage I was stuck for ideas and I had no clues about what I was going to do for this project, I decided to speak to the designer of the oresomegallery website (who happened to be in uni) and he gave me some interesting things to look into and also he gave me some ideas about how to adapt my ideas so that they could be more manageable.

Idea three-

Although it would be very time consuming I began to consider the idea of roto-scopeing the jewellery making process which would mean going to the company and filming the process, so I contacted the company an email to see if this would be possible so once I have the footage I will create a few test pieces and go from there.

f.m.p rethink (the final changes I’m making to the project)

My f.m.p has gone through several changes since beginning the original idea last year, from a dream sequence to a sinister confrontation between two characters.

And with it being so close to the end now it would seem silly of me to start over again with another idea,

But that’s what I have done, there are several reasons behind this restart the first being that I wasn’t happy with the project I was doing, every time I sat down to work on it I just found myself thinking, why am I doing this its boring I wasn’t enjoying what’s supposed to be a personal project, the second reason is that I some how turned a simple project into something to complicated for me to finish so even if I did continue with the original project I don’t think id ever manage to complete it to a satisfactory level so I sat down and had a think about what I was going to do and I decided the best solution was to break my project down and simplify it .

After doing this I decided to go with combining several elements of my huge piece into a smaller sequence showing 2 characters battling, this ay sound complicated but I have got so much further with the animatic for this piece in one weekend than I had gotten with the bigger one in almost a year so I think this was the right move for me.

Please see the new storyboards and animatic for the new story.

animatics

animatic one

animatic two

animatic three


this is the final rough animatic ,i will be producing from here on its the  final piece ……


just after christmas i was looking through my work deciding what i would like to put into my end of year show and i realised i didn’t have much that i wanted to display  on the walls so with that in mind i set myself a task ,the task was to try and design a few character sheets to a high standard so that i could display then at the degree show.

i feel like i have come along way in character design since my first year , one of our projects was to produce a character sheet and to be honest i couldn’t do it  as i didn’t have the skills required and the piece i produced was abysmal so i refused to let it be displayed with the others work.


finished sheets 


character sheet one – sebastian 

Screen Shot 2014-02-19 at 00.41.14


This design is based on my flat mate josh , the character is a for a story i was considering  writing as a comic about kids with powers that are kept in a strange school ,sebastian was the first design i came up with ,his design is really simple and i feel like i did a good job with his overall look.

i also wanted to incorporate a school logo (which i designed myself) into the background to give it a more interesting look and i also took into consideration the placement of the text on the page as a pose to leaving it hanging at the top or in the middle i used the space left over with ought it getting in the way of the character or the logo.


character design two – Dan
Screen Shot 2014-02-19 at 00.34.02


with this design it took a lot of work as i wanted to get the colouring right , i also went for a different style to my previous sheet as i think being able to change design styles is a good way to show how adaptable you are, the character is one i have been thinking about for a long time like with the previous character he is a design for a comic idea i have about children fighting with the power of dragon spirits.

there are some huge improvements in comparison to the previous sheet ,for example i opted to keep the white background as i wanted the viewers attention to be solely on the character ,i also was highly considerate about where the text would be placed as i knew that a longer piece of text needed ample space so it could be read clearly and finally the colour keys ,i looked around at other designers sheets and most of them included colour keys which is the one element i was missing .


character sheet three – seth


Screen Shot 2014-01-24 at 17.38.35


this design is actually a character of my 2 year old nephew that his mum and dad commissioned me to design ,with this piece i wanted it to be unique so after looking around at  all sorts of different  design styles i eventually came across  some artwork for the game harvest moon and i decided that this was the style i would go for.

the orrigional comision was just one front design so i only needed to do a basic sheet (hence the smallness of the piece ).

and after completion i received a lot of positive feedback from the commissioners so I’m pleased with this design and I’m really happy that i was able to design it for them.


Professional practice (end of year show)

The End of Year Show is fast approaching and as part of our professional practice unit we are tasked with planning our show, this involves networking with the other New Media courses (so that we can keep up to date with any changes to the show) as well as a huge amount of planning.

our space

The layout

Each of us have our own designated areas, but it is all about trying to figure out what will go where and most importantly what we will need for the show.
For our show we have two rooms (please see Google sketch up file) the first will be our display room in which we will be displaying our artwork, character sheets etc. and out show reels, the second room will be our “dark room” in which we have decided to have a projector to display our f.m.p projects in a cinema environment.

sketch up file

1004963_746367722042672_311470467_n

Equipment/items list (so far)

• Four mac computers
• Projector
• Tables X3
• Foam core (for displaying images)
• Roll of paper (for the walls)
• Curtains (for the dark room)
• Chairs
• Material for tables